Injections: How To
A practical procedural guide for self-administering estradiol injections (and other oil-based feminizing HRT injectables: hydroxyprogesterone caproate, GnRH agonists when self-administered). The goal is to give you enough to do this safely; it is not a substitute for hands-on instruction from a clinician the first few times if that's available to you.
If you've never done an injection before, the first one is the scariest and every one after gets routine. Most people who do injections find them simpler than the daily ritual of sublingual or transdermal dosing.
Sterile technique matters
Infections from sloppy technique are rare but real. Wash your hands, wipe the vial and skin with alcohol, never reuse needles, and dispose of sharps properly. If you see expanding redness, warmth, swelling beyond the immediate injection site, or develop a fever, contact a provider — those are signs of infection, not normal post-injection soreness.
IM vs subcutaneous
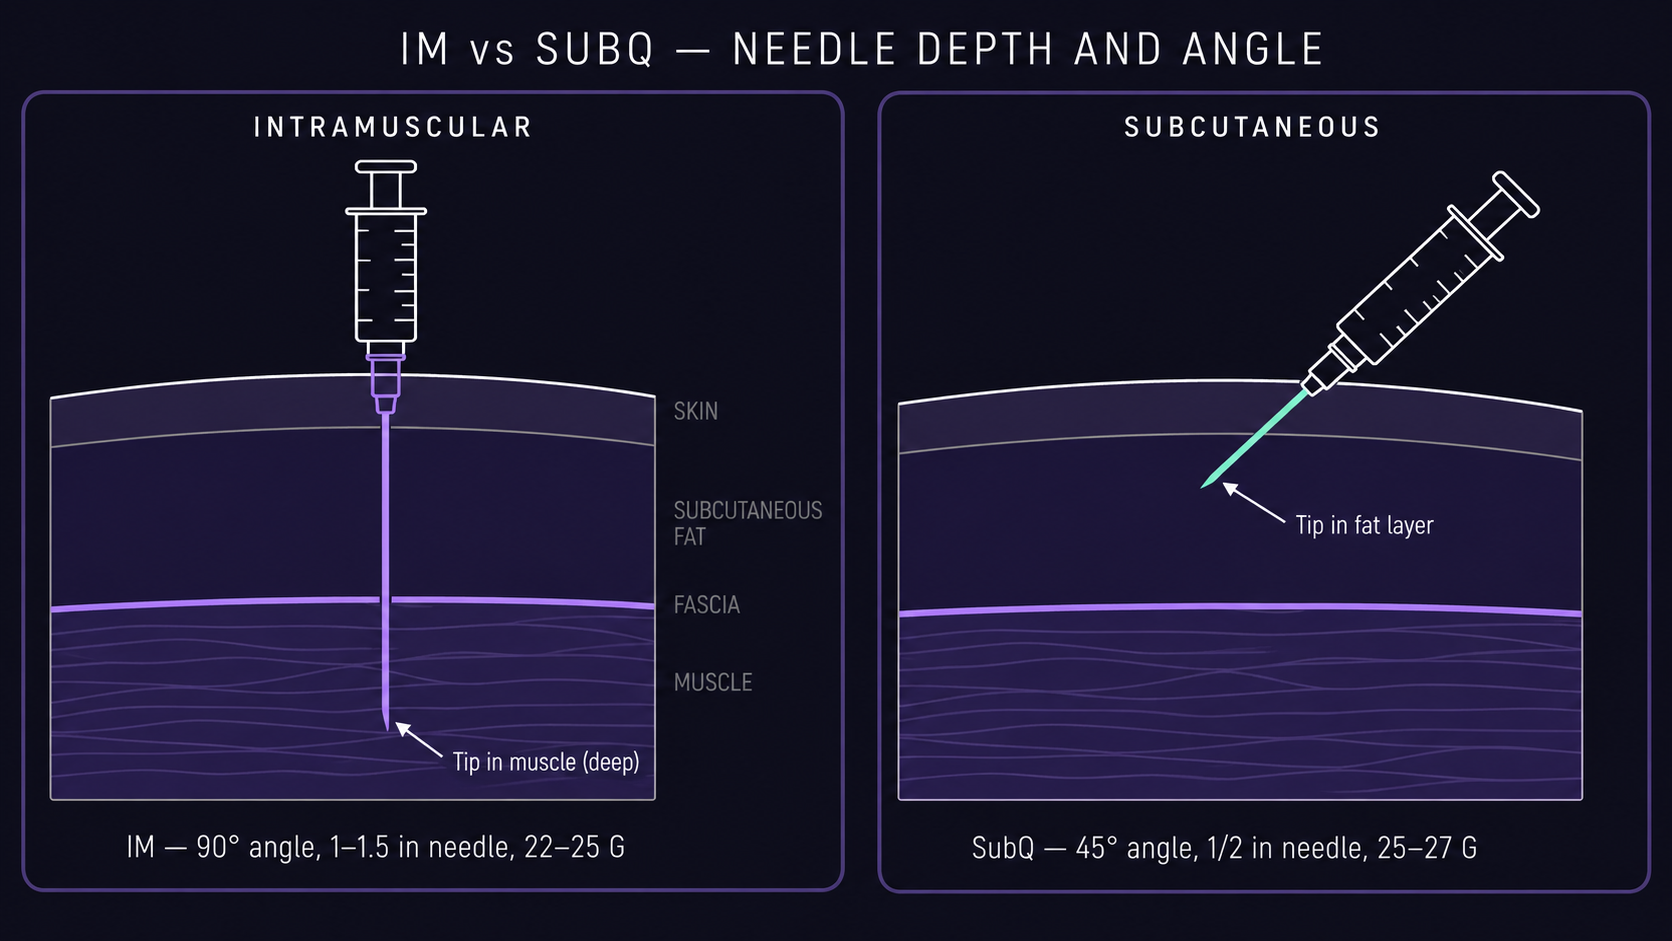
Two routes are commonly used for feminizing HRT injectables:
| Route | What it is | Pros | Cons |
|---|---|---|---|
| Intramuscular (IM) | Into a large muscle (gluteal, thigh) | Faster absorption; well-validated; longer history | Larger needle; more painful; harder sites for self-injection |
| Subcutaneous (SubQ / SC) | Into the fatty layer just under the skin (abdomen, thigh) | Smaller needle; less painful; easy self-injection sites | Slightly slower onset; some users get more injection-site nodules |
Current evidence (2024–2025): Multiple recent studies have found IM and SubQ produce comparable serum estradiol levels at similar doses for feminizing HRT. The choice is increasingly one of preference and tolerability rather than efficacy. SubQ has become the default in many informed-consent clinics for new starters because it's easier to learn and less intimidating.
A 2025 systematic review and 2024 scoping review both suggest that current Endocrine Society injectable dose ranges (5–30 mg every 2 weeks) may be higher than necessary, with ≤5 mg weekly often producing therapeutic estradiol levels via either route.
Supplies
Gather everything before you start. Doing this halfway through is how things go wrong.
| Item | Spec |
|---|---|
| Vial | Your prescribed estradiol valerate or cypionate (or other injectable) |
| Syringe | 1 mL, with Luer-lock tip preferred (less likely to leak under pressure) |
| Drawing needle | 18–21 G, 1–1.5" — fast for pulling oil out of the vial |
| IM injection needle | 22–25 G, 1–1.5" depending on body composition (thicker = longer needle to reach muscle) |
| SubQ injection needle | 25–30 G, 1/2" or 5/8" — short and fine |
| Alcohol wipes | Single-use; one for the vial, one for the skin |
| Sterile gauze | For pressure after withdrawal |
| Sharps container | FDA-approved; never use a regular trash can |
| Bandage (optional) | For minor bleeding |
On the two-needle approach: A larger-gauge "draw" needle pulls oil out of the vial faster (oil is viscous), and a smaller-gauge "inject" needle goes into your body. Pulling oil through a 25 G needle is slow and the needle is also less sharp by the time you inject. Using two needles is the standard.
Injection sites
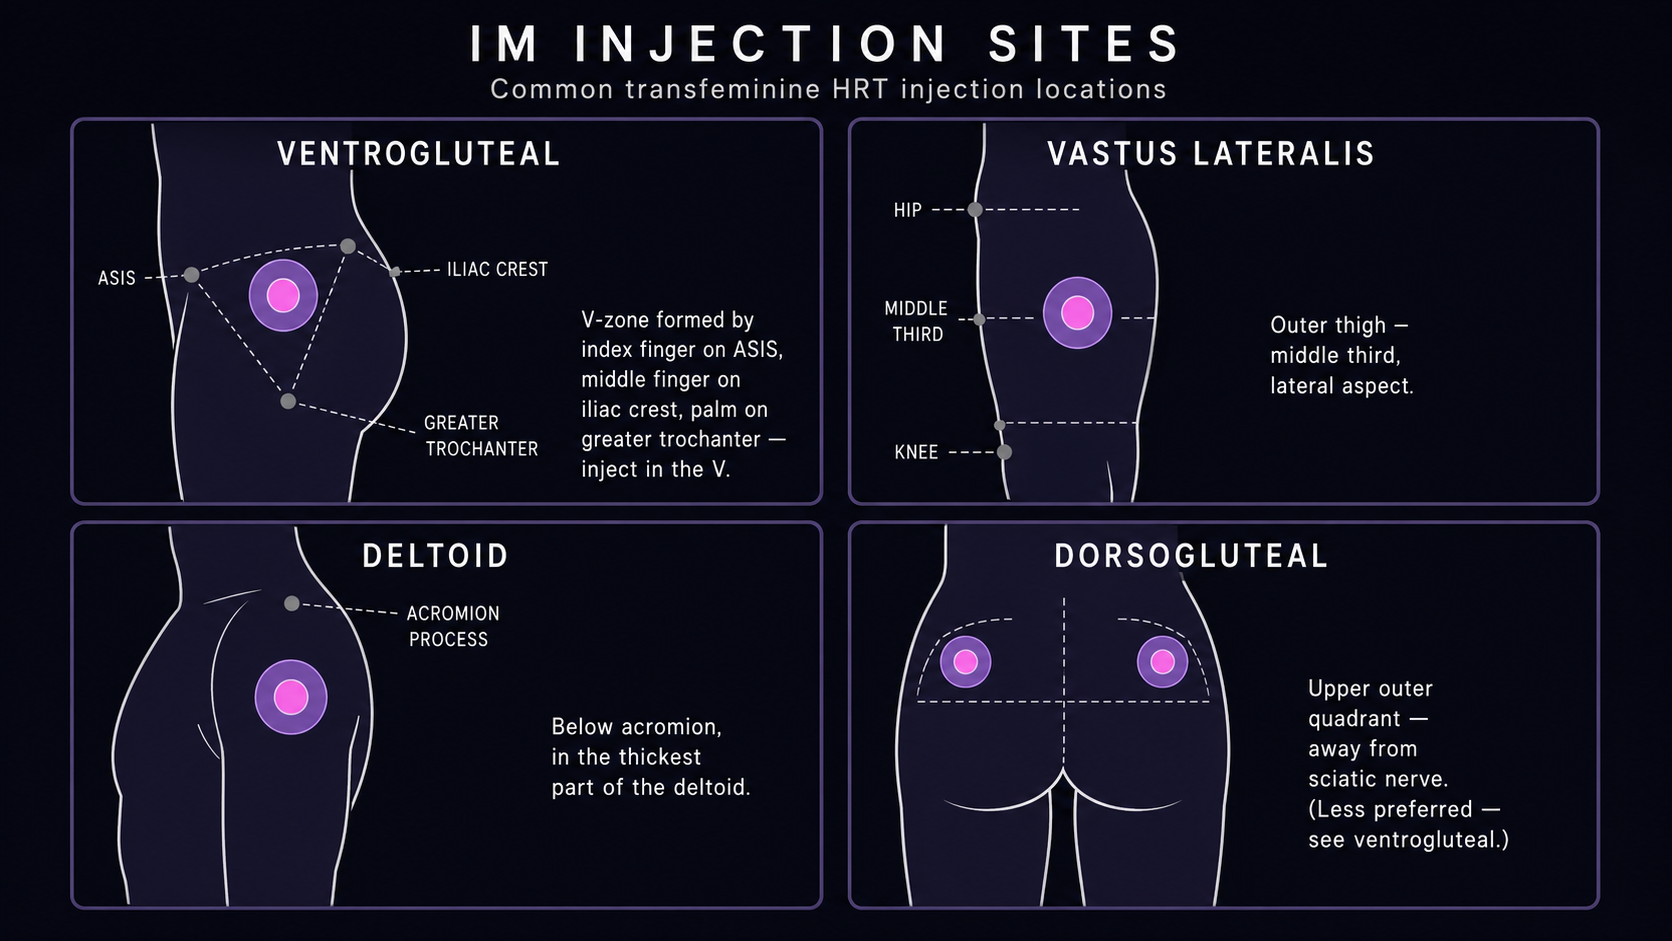
IM sites
Three sites are recommended for IM injections; one is no longer recommended.
Ventrogluteal (side of hip) — the safest IM site for adults. Place the heel of your opposite hand on the greater trochanter (the bony bump at the top of your femur), index finger pointing toward the anterior superior iliac spine (the front bony point of your hip). The "V" between your index and middle fingers is the injection target. Far from the sciatic nerve and major vessels.
Vastus lateralis (outer mid-thigh) — easiest site for self-injection. Divide your thigh into thirds vertically (hip to knee); use the middle third on the outer side. You can sit and reach this site easily.
Deltoid (upper arm) — only suitable for small-volume injections (≤1 mL); the muscle is small. Most feminizing HRT doses fit, but the site has limited rotation capacity if you're injecting weekly.
Dorsogluteal (upper outer buttock) — historically the default, no longer recommended by modern nursing guidelines because of proximity to the sciatic nerve. If you've been using it without problems, you can continue, but for new injectors the ventrogluteal site is safer.
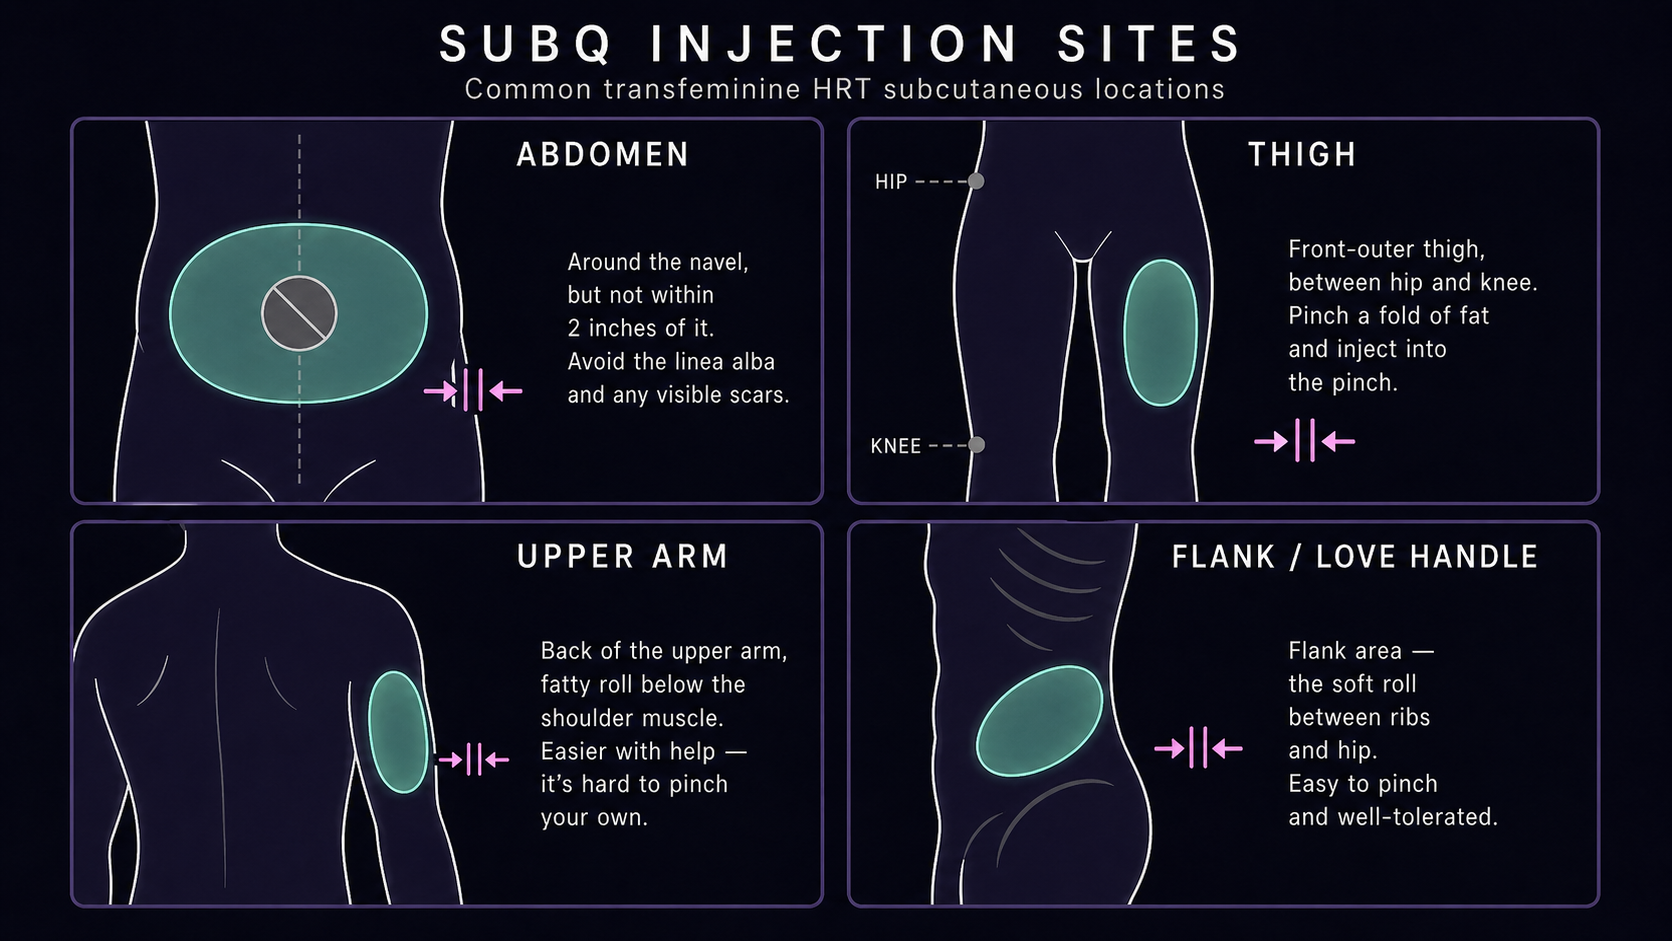
SubQ sites
The fatty layer between skin and muscle. Pinch about 1 inch (2.5 cm) of skin/fat — if you can pinch a fold, the site has enough subcutaneous tissue.
- Lower abdomen — anywhere on the belly, avoiding a 1" radius around the navel and any scars
- Front or outer thigh — same general area as vastus lateralis but the SubQ layer above it
- Upper outer arm — pinch the back of the upper arm; harder to self-inject
- Love handles / flank — soft, easy to pinch, good rotation site
Step-by-step
Drawing up
- Wash your hands thoroughly with soap and water. Dry on a clean towel.
- Lay out supplies on a clean surface. Open everything you'll need but leave needles capped.
- Inspect the vial — look for cloudiness, color change, or particles. Discard if anything looks off.
- Wipe the vial top with an alcohol swab. Let it dry (don't blow on it).
- Attach the drawing needle to the syringe. Remove the cap.
- Pull air into the syringe equal to your dose volume (e.g., 0.2 mL of air for a 0.2 mL dose).
- Insert the drawing needle through the vial's rubber stopper.
- Inject the air into the vial. This equalizes pressure so the oil flows out easily.
- Invert the vial so the liquid covers the needle tip.
- Pull the plunger back slowly to draw your dose. Pull a small amount extra so you can push back to remove air bubbles.
- Tap the syringe to make air bubbles rise to the top, then push the plunger gently to expel them and adjust to the exact dose.
- Withdraw the needle from the vial.
- Switch to your injection needle. Carefully unscrew the drawing needle and dispose of it in the sharps container; attach the fresh injection needle. Do not recap.
Injecting (IM)
- Choose a site based on your rotation tracking (see below).
- Wipe the skin with an alcohol swab in a spiral outward from the injection point. Let it dry — wet skin alcohol stings on insertion.
- Z-track (strongly recommended for oil-based injections): Pull the skin and subcutaneous tissue over the muscle laterally about 1 inch (2.5 cm) and hold it there with your non-dominant hand.
- Insert the needle at a 90° angle in one quick smooth motion. Don't slap; don't go slowly.
- (Optional) aspirate by pulling the plunger back briefly. If blood appears, withdraw and start over with a new needle at a different site. (Modern guidance: aspiration is not strictly necessary for ventrogluteal or vastus lateralis — those sites have no major vessels in the injection path. Many providers still teach it; many don't. It doesn't hurt to do.)
- Slowly inject the medication — 10 seconds per mL is a useful pace. Slower is more comfortable.
- Wait 5–10 seconds after the plunger bottoms out, with the needle still in place. This lets the oil disperse from the needle tip rather than tracking back along the path.
- Withdraw the needle at the same angle you inserted it.
- Release the skin. The Z-track shift snaps back, sealing the needle path under intact skin and minimizing leakage.
- Apply gentle pressure with sterile gauze for 30 seconds. Do not massage IM injection sites — it can increase bruising.
- Dispose of the needle immediately in the sharps container without recapping.
Injecting (SubQ)
Same as IM with these differences:
- Pinch up ~1 inch of skin and fat between thumb and forefinger of your non-dominant hand. Insert into the pinched fold.
- Insert at 45° if you're lean (less SubQ tissue) or 90° if you have a thicker SubQ layer.
- No Z-track needed for SubQ.
- Aspiration not recommended for SubQ — the tissue doesn't have the vessels that aspiration is meant to detect, and pulling back can cause unnecessary tissue trauma.
- Light gentle massage of the site after withdrawal is acceptable for SubQ (helps disperse the medication), unlike IM.
Site rotation
Repeated injections in the same spot cause lipohypertrophy (fatty lump under the skin) and scar tissue, which interferes with absorption and creates uneven dosing over time.
- Rotate between sides (left vs right) every injection
- Rotate between sites (e.g., abdomen → thigh → opposite-side abdomen → opposite-side thigh) over a four-injection cycle
- Within a site, vary the exact spot by at least 1 inch from previous injections
- Track your rotation in a notes app, paper log, or specialized injection-tracking app
- Avoid any site that's bruised, swollen, red, or has a palpable lump
Storage
- Oil-based injectable esters (estradiol valerate, cypionate, enanthate, undecylate; progesterone in oil; hydroxyprogesterone caproate) are stable at controlled room temperature (~20–25 °C); refrigeration is not required and can thicken the oil, making it harder to draw. Avoid prolonged exposure above ~30 °C.
- Aqueous suspensions (some Depo-Provera and certain compounded depot formulations) follow different storage rules — refer to the manufacturer's label or the compounding pharmacy's instructions. If a vial is milky and labeled "shake well," it's likely aqueous; clear viscous liquid is oil-based.
- Keep vials away from direct sunlight and heat sources (cars in summer are bad).
- Once opened (rubber stopper punctured), most multi-dose vials are good for ~28 days per manufacturer label, though community practice often extends this with proper sterile technique.
- Discard any vial showing cloudiness, discoloration, or visible particles — even before the expiration date.
- Discard at the labeled expiration date regardless of appearance.
Sharps disposal
This isn't optional. Sharps in regular trash are a hazard for sanitation workers.
- Use an FDA-approved sharps container, or a heavy plastic container with a screw-on lid (e.g., empty laundry detergent jug) labeled "Sharps — Do Not Recycle."
- Never recap a needle. Most needlestick injuries happen during recapping. Drop the needle directly into the sharps container while still attached to the syringe.
- When the container is ~3/4 full, seal it and dispose per local rules. Most US states accept full sharps containers at:
- Pharmacies (CVS, Walgreens, Walmart often accept)
- Hospital outpatient programs
- Some local fire stations or police stations
- Mail-back programs (search "sharps mail-back" plus your zip code)
Troubleshooting
| Issue | What to do |
|---|---|
| Air bubble in syringe before injection | Tap to top, push plunger gently to expel; tiny bubbles are not dangerous |
| Blood appears on aspiration | Withdraw, dispose of needle, start over at a different site with a fresh needle |
| Bleeding from injection site after withdrawal | Apply pressure for 1–2 minutes; small amount of bleeding is normal |
| Soreness or ache for 1–3 days post-injection | Normal. Warm compress or gentle stretching helps. Ice in the first hour can help if very sore |
| Visible lump at injection site (pea-to-marble size) | Often a "sterile abscess" from oil — usually resolves over days to weeks. Rotate away. Warm compresses can help. |
| Persistent lump weeks later | Stop using that site; mention to provider next visit |
| Expanding redness, warmth, swelling beyond the immediate site | Possible infection — contact provider promptly |
| Fever, chills, flu-like symptoms after injection | Possible infection or allergic reaction — contact provider |
| Oil too thick to draw (any oil-based ester) | Briefly warm the closed vial in your hand or on a heating pad set to low. Do not microwave. Common with cold or refrigerated vials. |
| Needle bends during insertion | Withdraw, dispose, start over with a fresh needle. Never re-insert a bent needle. |
When to call your provider
- Signs of infection (expanding redness, warmth, fever, pus)
- Severe or persistent injection-site pain that doesn't resolve in days
- Allergic reaction symptoms (hives, difficulty breathing, swelling)
- Vial appearance changes you can't explain
- Persistent serum estradiol levels well outside the target range despite consistent technique (see Blood Draws)
Further reading
For patient-facing video walkthroughs and additional perspectives on the same procedure:
- FOLX Health — Hormone Self-Injection Guide — visual step-by-step with photos
- Plume — All About Injections — patient FAQ
- Plume — Taking estrogen by subcutaneous or intramuscular injection — comparison guide
- Planned Parenthood — How to Give Yourself a Hormone Injection (PDF) — printable IM injection guide
Sources
- Comparison of Subcutaneous Versus Intramuscular Estradiol Administration for Feminizing Gender-Affirming Hormone Therapy — PMC 2025 — single-center retrospective showing comparable serum E2 at 6 months
- The Use of Injectable Estradiol in Transgender and Gender Diverse Adults: A Scoping Review of Dose and Serum Estradiol Levels — Endocrine Practice 2024 — argues current guideline doses may be too high
- Estradiol Concentrations for Adequate Gender-Affirming Feminizing Therapy: A Systematic Review — LGBT Health 2025
- Injectable Estradiol Dosing Regimens in Transgender and Nonbinary Adults Listed as Male at Birth — PMC 2025
- Anatomically safe sites for intramuscular injections: a cross-sectional study on young adults and cadavers with a focus on the thigh — PMC — anatomic basis for site selection
- Intramuscular Injection — StatPearls / NCBI — comprehensive technique reference
- BC Campus Open Textbook — Intramuscular Injections (Clinical Procedures for Safer Patient Care) — open-access nursing technique reference