Eyebrow Shaping for Passability: A Practical Guide for Trans Women
Eyebrows are one of the highest-leverage things you can change. They cost nothing, they're reversible (with patience), and a good shape can shift how feminine your whole upper face reads, sometimes more than makeup or hair changes do. This guide combines the brow-mapping logic used by professional waxers with the specific sex-dimorphic differences that matter for passability.
1. What actually differs between male and female brows
Before shape, understand what you're aiming for. The masculine brow tends to be:
- Thicker top to bottom, with denser hair
- Straighter (less arch), with the tail at roughly the same height as the head
- Lower on the face, sitting on or below the orbital rim (the bony ridge above the eye)
- Closer to the eye, with less visible lid space
The feminine brow tends to be:
- Thinner top to bottom, especially through the body
- Arched: the outer third lifts noticeably higher than the inner head
- Higher on the face, sitting just above the orbital rim
- Further from the eye, leaving more visible lid space ("eye real estate")
- Cleaner, more defined top edge with a softer underside
A useful mental model: in a feminine brow, the tail is higher than the head. In a typical untouched male brow, the tail and head sit at roughly the same elevation, or the tail even drops.
That elevation difference in the outer third is the single most important thing to get right.
Important caveat on lifting: there's a real "uncanny valley" with brow lifts and over-plucked high arches. Female brows are not dramatically higher than male brows in absolute terms, what reads feminine is more lid space (created by thinning the top edge and a modest lift), not brows pushed up toward the hairline. Aim for a few millimeters of lift, not a startled expression.
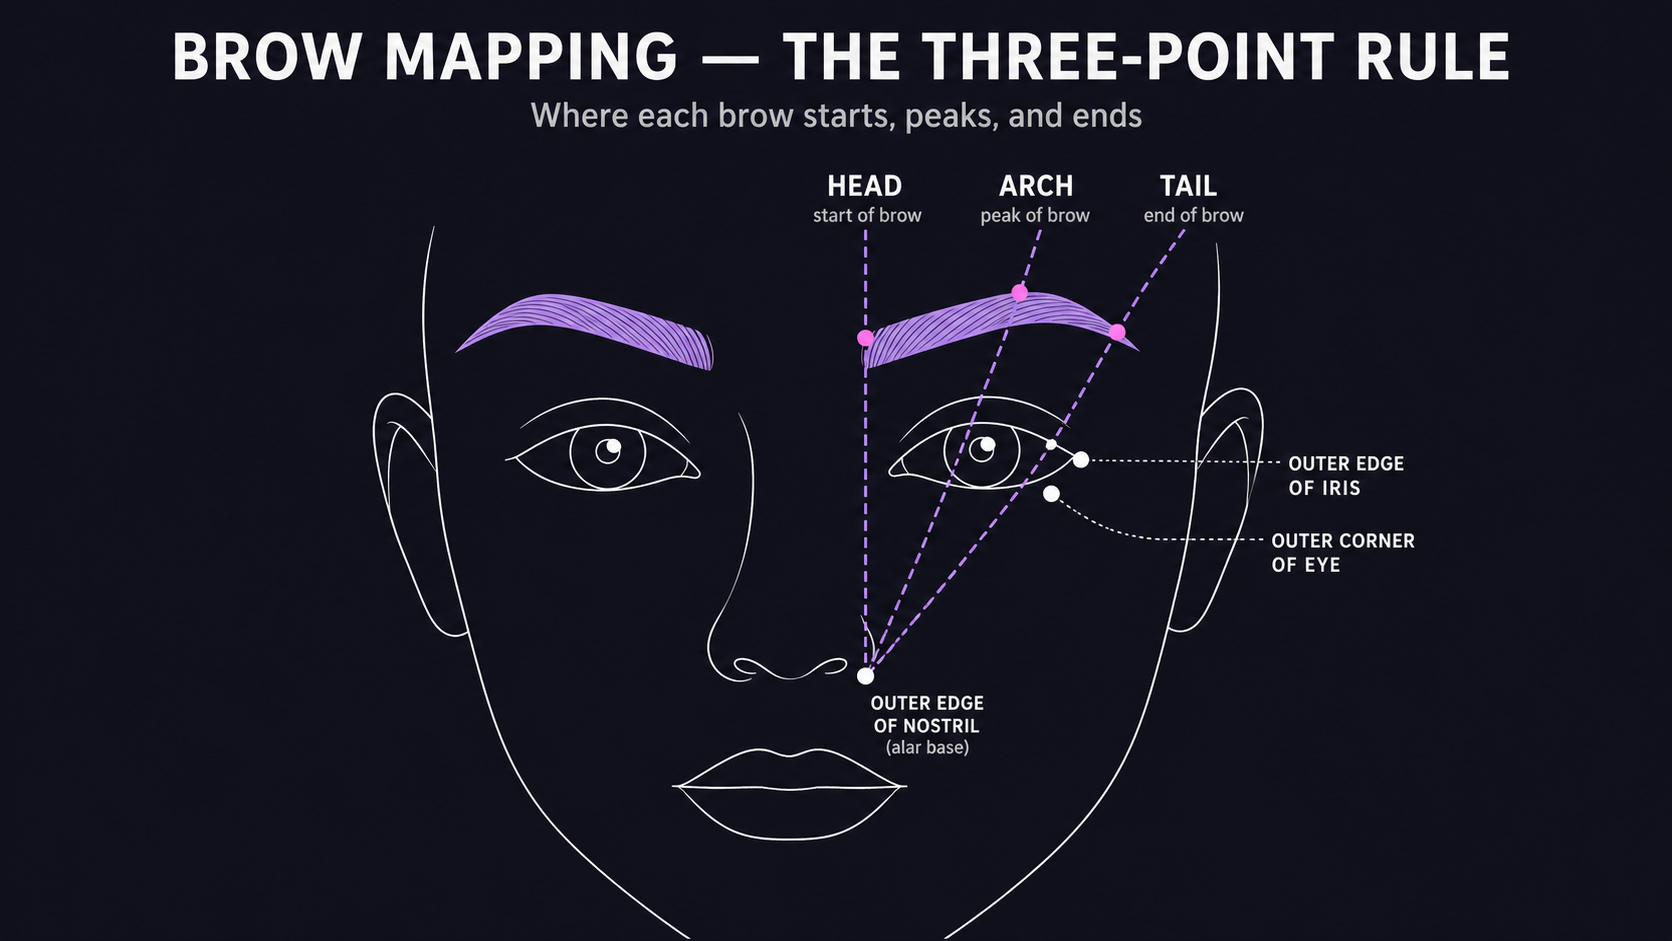
2. Brow mapping: the three points
This is the framework professional brow artists use. Get a slanted brow pencil (or eyeliner) and a small ruler or any straight edge. Stand in good light with a mirror.
You're going to mark three points on each brow.
Point 1: The head (where the brow starts)
Hold the straight edge vertically from the outer edge of your nostril straight up past your eye. Where it crosses the brow line is where the brow should start.
For most people, this means removing some hair from between the brows (the unibrow zone) and possibly from the very inner edge of each brow. A common male-pattern issue is brows that start too far inward, making the face look heavier and the eyes closer-set. Cleaning up the head opens the whole face.
Point 2: The arch (the highest point)
Now angle the same straight edge from the outer edge of your nostril through the outer edge of your iris (the colored part of your eye, not the pupil, the outer edge). Where it crosses the brow is where your arch's peak should sit.
Note: many older guides say "through the pupil." That places the arch too far inward and creates a more theatrical, vintage look. Aligning the peak with the outer iris (or, equivalently, about two-thirds of the way along the brow) gives the modern, naturally feminine arch placement. The arch should sit roughly above the upper orbital rim.
Point 3: The tail (where the brow ends)
Angle the straight edge from the outer edge of your nostril through the outer corner of your eye. Where it crosses the brow is where the brow should end.
A few rules for the tail:
- The tail should end at the same height or higher than the head. If your tail droops below the head, the whole face reads heavier and sadder. This is one of the strongest masculine→feminine shifts you can make.
- The tail should taper to a fine point, never blunt or boxy.
- Don't take the tail past the diagonal line; an over-extended tail looks dated and can drag the face down.
Connecting the points
Once those three points are marked on each brow, lightly draw the outline:
- Head: soft, slightly rounded, never blocky. Avoid the harsh "Instagram brow" front edge, it reads heavy and masculine on most faces.
- Body (head to arch): a gentle upward sweep, not a flat line.
- Arch: a soft peak, not a sharp angle. Sharp peaks read drag-y; soft peaks read feminine.
- Tail (arch to end): a graceful descent, but ending above the level of the head.
Now you have a target shape. Anything outside that outline is a candidate for removal.
3. Choosing a shape for your face
There are no hard rules here, the best shape is one you wear with confidence, but these are the working guidelines waxing professionals use, adapted with passability in mind:
- Square face (strong jaw, wide forehead): a soft arch with definition. Avoid totally flat brows; they reinforce angularity. Avoid overly sharp arches too, you want to soften, not add more angles.
- Oval face: soft angle with a shallow arch. Oval is the most flexible face shape; you can lean into a slightly stronger arch for extra femininity if you want.
- Round face: a lifted, more angled arch. The vertical lift visually lengthens the face. This is often a good shape for trans women with rounder faces post-HRT.
- Long/rectangular face: a flatter brow with a softer arch. Strong arches will lengthen the face further; you want horizontal emphasis. Be cautious, too flat reads masculine, so keep some lift in the outer third.
- Heart-shaped face (wider forehead, narrower chin): a higher, more rounded arch complements the natural narrowing.
- Diamond face (wide cheekbones, narrow forehead and chin): rounded brows soften the angles and balance the cheekbones.
If you don't know your face shape, that's fine, start with a soft, gently arched brow, which works on most faces, and adjust from there.
A note specific to passability: many trans women have heavier brow bone (orbital ridge) and a wider/flatter forehead than cis women. A modestly higher arch and a thinner brow body help create lid space and visually soften the brow ridge. Don't go too thin, over-plucked pencil brows from the early 2000s look both dated and not particularly feminine. Aim for a groomed full, not thin.
4. Removal: tweezing, waxing, threading
Now you have a shape mapped. Time to remove what's outside the lines.
Methods
- Tweezing: highest control, slowest. Best for precision and ongoing maintenance. Pluck one hair at a time, in the direction of growth, after a warm shower when pores are open.
- Waxing: fast and gives a clean line, but unforgiving, a bad wax takes weeks to grow back. A first session with a professional brow artist is worth the money; you can maintain with tweezers afterward.
- Threading: very precise, especially good for the fine hairs around the brow. If you have someone skilled nearby, this is often the cleanest result.
- Laser/electrolysis: permanent removal of hairs you're certain you'll never want again. Often used for the unibrow zone or hairs well below the new brow line. Be conservative, laser commitments are forever.
- Razor/dermaplaning: not recommended for shaping the brow itself; fine for vellus (peach-fuzz) hair around it.
Core rules: these matter
- Start slow. "You can always take more off but you can't put it back on." This is the single most-repeated piece of advice in every brow guide for a reason. Remove a few hairs, step back, look in the mirror, repeat.
- Pluck mostly from the bottom. The masculine brow is heavy on the underside, with hair encroaching down toward the eyelid. Removing from below opens the eye and lifts the brow visually without sacrificing the brow body.
- Be careful with the top edge. Some top-edge cleanup is fine and necessary for a defined feminine line, but over-thinning the top is what creates the dated 2000s look. The top edge wants to be defined, not aggressively reshaped.
- Brush before you pluck. Use a spoolie (a clean mascara wand) to brush hairs upward, then trim any hairs that extend well above the natural top line with small scissors. This alone tidies a brow surprisingly well without removal.
- Never tweeze in a magnifying mirror until you've gained experience. People always over-pluck in magnifying mirrors. Use a normal mirror for shaping decisions.
- Walk away regularly. Tweezing has a hypnotic just-one-more quality. Set a limit (e.g., 10 hairs per side) and stop, even if you can see more to remove. Come back tomorrow.
What if you've already over-plucked?
It happens to almost everyone. Strategy:
- Stop plucking entirely for 8–12 weeks.
- Use a brow growth serum (castor oil works for some; commercial serums like RapidBrow or Grande Brow more reliably).
- Fill in the missing areas with brow makeup while it grows back (see next section).
- When growth returns, map and shape very conservatively.
5. Filling in: the makeup that makes the shape work
Even with perfect shaping, brow makeup is what completes the feminine effect, especially if HRT has thinned your brows or if your natural color is too pale to read as defined.
Tools
- Brow pencil (fine-tipped, like Anastasia Brow Wiz or NYX Micro Brow Pencil): for hair-like strokes that fill gaps.
- Brow powder or pomade: for depth and to fill larger areas.
- Tinted brow gel (like Glossier Boy Brow): sets hairs in place and adds subtle color. For many people this is enough on its own.
- Spoolie: to blend everything and break up harsh lines.
Technique
- Brush brows up and outward with the spoolie.
- With a sharp pencil, make small upward, hair-like strokes in any sparse areas. Don't draw a solid outline, that reads drawn-on.
- Pay special attention to filling out the body and tail. The head should be the lightest-filled part of the brow; gradually deepen toward the arch and tail.
- If using powder or pomade, apply with a small angled brush, starting from the arch and working outward, then back toward the head with whatever is left on the brush.
- Set with clear or tinted brow gel.
- Optional but high-impact: a touch of concealer or a highlighter pencil along the bottom edge of the brow cleans up the line and creates the appearance of a sharper lift. This is one of the most effective single tricks for making brows look groomed and lifted.
Color
- Match the brow product to your hair, but go one to two shades lighter than you'd think. Brows that are too dark read drawn-on and harsh, which masculinizes.
- If your hair is very dark, use a grey-toned brown rather than black.
- If your hair is light/blonde, a taupe or soft brown works better than matching exactly to your hair color, which often disappears.
6. Optional add-ons
- Brow tinting: a salon service that dyes the brow hairs (and sometimes the skin underneath) for 2–3 weeks of darker, fuller-looking brows. Great for sparse or pale brows; reduces daily makeup time considerably.
- Brow lamination: a chemical treatment that sets the brow hairs in a brushed-up direction for up to 8 weeks. Creates a fuller, more defined look. Combines well with tinting.
- Microblading / nano brows / powder brows: semi-permanent tattooing that fills sparse areas with hair-like strokes or a soft powder finish. Lasts 1–3 years. Worth considering if your brows are very thin or asymmetric, but go to a highly experienced artist, bad microblading is hard to fix.
- Brow transplants: a surgical option (often offered alongside FFS) where hair follicles are transplanted to the brow. Permanent, but expensive and requires significant healing.
- Surgical brow lift: an FFS procedure that elevates the brow position. Worth discussing with an FFS surgeon if your brows sit very low and shaping/makeup aren't getting you where you want to be. Be cautious of surgeons who default to aggressive lifts on every trans patient, a few millimeters is usually enough, and over-lifting creates a permanent surprised expression.
7. Quick-reference checklist
Before you pick up the tweezers, run through this:
- Brow starts above the outer edge of the nostril (vertical line)
- Arch peaks above the outer edge of the iris (diagonal line through outer iris)
- Tail ends along the diagonal from nostril through outer eye corner
- Tail sits higher than the head
- Head is soft, not blocky
- Arch is rounded, not sharply peaked
- Brow is groomed-full, not aggressively thin
- Underside is cleaner than the top side (most removal happens below)
- You've stopped before you wanted to
8. The honest meta-advice
Brows are deeply personal. The shape that maximizes "passability" on paper isn't always the shape that makes you feel most like yourself, and confidence in your face matters more than millimeter-perfect mapping. The geometry above is a solid starting framework, but you're allowed to deviate, slightly thicker brows can look beautiful and feminine, slightly straighter brows can suit certain face structures, and trends shift.
If you can afford it, your first session with a skilled brow artist (especially one experienced with trans clients) will teach you more in 30 minutes than any guide can. After that, maintenance with tweezers at home is easy.
Take your time, pluck conservatively, and remember that brows grow back.